It’s been a long time since we got some specialAdobe Camera Raw color profiles for the Lumia 1020 and 1520. That was great for the RAW DNG photographers out there, but what we really need are some lens correction profiles. That never happened, so I decided to make my own geometric distortion, chromatic aberration, and vignetting fall off models to use with my Nokia Lumia 1020 and its awesome 41 megapixel camera. Of course, you can do it with whatever camera you want, too.

First off, Adobe already makes a bunch of lens correction profiles for a large variety of popular DSLR camera and lens combinations. In most cases, you can turn on the “Lens Profile Corrections” checkbox in Adobe Camera Raw or Lightroom and it will automatically recognize your lens and camera body combination along with its zoom focal length and aperture settings. Then it will use those settings to reference the profile’s geometric distortion, chromatic aberrations, and vignetting models in order to automatically compensate for the lens’ flaws. Those flaws can vary significantly between apertures and focal lengths as well, so the correction profile really needs a pretty large amount of data about how the lens behaves.
Luckily, the Lumia 1020 that I’ll be using in this example has only one focal length in the lens and only one aperture size. That will make creating lens correction models much easier, but it will still be a lot of work. If you don’t feel like actually learning how to do it and just want to download the profile I made, feel free to skip to the end.
Download the Adobe Lens Profile Creator
First, you’ve got to download the Adobe Lens Profile Creator. It’s a combination of grids that you’ll have to print out along with some software for analyzing the results and some documentation. It’s available for Mac and Windows PCs. Once you download the ZIP file, you’ll find all the folders clearly labeled and there will be an application that you can run once you have a good set of RAW DNG photos to import.
Photographing the calibration prints
First, you need to photograph some checkerboard prints. I chose to use the “Landscape Letter – 8.50 In x 11.00 In (Square Print Dimension 54 Pts, Version 9 x 13)” chart. Simply print it out and either mount it to some stiff card board or tape it to a wall. It has to be flat in order to work properly. Don’t print it on glossy paper or put it behind glass since that could cause reflections that will interfere with the checkerboard pattern.
Mount the camera on a tripod that’s just about even with the same plane as your checkerboard print. You want to place it close enough so that the grid pattern fills between 25 – 50% of the frame. I made my frame a little smaller still, but the overlap seemed to be plenty. Set the camera to manual control so that everything stays consistent because you’re going to be taking at least 9 shots. It’s most important that you set the ISO level to its lowest number. You don’t want extra noise interfering. Don’t forget to set the file format to the camera’s RAW format. You could do this with JPGs or TIFs too, but if you’re interested in lens correction profiles, you’re probably already shooting in RAW format and the RAW data will give you extra flexibility anyway. And if you’re going to shoot JPGs, do not use digital zoom at all ever! The DNG RAW files won’t include your digital zoom level on phones like the Lumia 1020, but if you’re shooting something as JPGs, just remember not to zoom because that will be cropping the image to a different part of where the lens is capturing data and therefore your lens correction profile won’t be correcting the correct parts of the image. 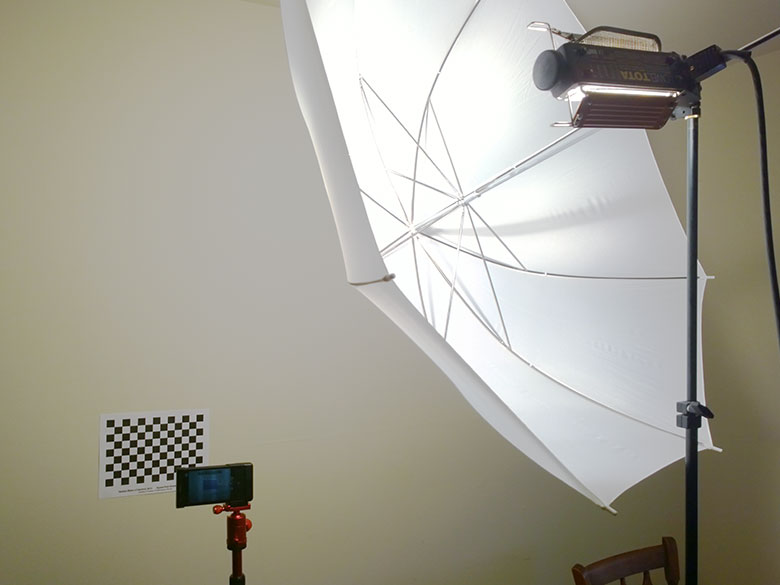 It’s also important to keep the lighting constant and consistent. Ideally you would put two lights at 45 degree angles from the checkerboard grid, but really you just need it to be bright enough for the camera and the same for each shot.
It’s also important to keep the lighting constant and consistent. Ideally you would put two lights at 45 degree angles from the checkerboard grid, but really you just need it to be bright enough for the camera and the same for each shot.
Next, you’re going to start with a shot of the checkerboard grid straight on in the middle of the frame. Then rotate the head of the tripod so that the checkerboard is placed on the top center edge, take another shot, turn it a bit more so the checkerboard is in the corner… and repeat until you have 4 shots for the corners, 4 shots for the middle of each edge, and 1 for the center. That will give you 9 RAW DNG files.
Analyze the images with the profile creator
Now, just copy those DNG files from your phone to your desktop PC where you’ve got Adobe’s Profile Creator software. Choose File > Add Images to Project and select all of the DNG files you just shot. The software will organize them into a set on the left. In the right pane, you’ll have to type in the information about what type of checkerboard pattern you were photographing. In my case, it was the 9 x 13 version with 54 point dimensions. You can also fill out the Display name and Creator fields. Then press “Generate Profiles” and wait. You’ll have to wait for quite a while. I believe mine took about an hour to process.  When it’s finally finished, you’ll be prompted to save the newly created profile in the appropriate location.
When it’s finally finished, you’ll be prompted to save the newly created profile in the appropriate location.
On Windows, that would be: C:\ProgramData\Adobe\CameraRaw\LensProfiles\1.0
On Mac, the location would be: /Library/Application Support/Adobe/CameraRaw/LensProfiles/1.0
You can also save the profile to a similar folder within the user account folders, but I would rather have it accessible system-wide.
Putting it to use
Now all you have to do is open a DNG photo that was shot with your camera in the Adobe Camera Raw plug-in within Bridge or Photoshop… or open it within Lightroom. I prefer Bridge, so below you’ll see the lens corrections tab along with the “Enable lens profile corrections” checkbox.  In this screenshot, the vignetting and distortion is pretty obvious. The corners are noticeably darker and scaled a bit differently than the center area.
  When I turn on the lens profile correction, the dark corners are adjusted to be far more consistent with the rest of the image, and the lens distortion is corrected as well. Chromatic aberrations should be better, too, but I haven’t run into too many of those on the Lumia 1020’s Carl Zeiss lens.
In this screenshot, the vignetting and distortion is pretty obvious. The corners are noticeably darker and scaled a bit differently than the center area. When I turn on the lens profile correction, the dark corners are adjusted to be far more consistent with the rest of the image, and the lens distortion is corrected as well. Chromatic aberrations should be better, too, but I haven’t run into too many of those on the Lumia 1020’s Carl Zeiss lens.
Conclusion
This technique is naturally for the more advanced digital photographer and may be a bit daunting for average users, but since I started shooting RAW on my Lumia 1020 when it had that capability enabled, I can easily go back to my old DNG photos and apply my newly calculated lens correction profile in order to improve my old photos. You can also do this type of thing on a case-by-case basis with the manual sliders and just judge visually, but I like having a set profile that I can just apply globally. It’s probably not important if all you’re going to do is post some pictures to Instagram once in a while, but if you’re using something high-end like the Lumia 1020 for high-end photography like Steven Alvarez does for National Geographic.
Download the LCP file for the Nokia Lumia 1020.
How to make a lens correction profile for your smartphone
5:37 PM
adobe, lense, mobile camera


